If your sales forecast still lives in a spreadsheet, you’re missing out on one of HubSpot’s most powerful revenue tools. When set up correctly, the forecast tool turns your pipeline into a live, shared view of what’s likely to close – and how close you are to target.
-Nov-26-2025-08-02-13-8470-AM.png?width=2000&height=1127&name=Velocity%20Blog%20Featured%20Images%20(1)-Nov-26-2025-08-02-13-8470-AM.png)
Covered in this article
What the HubSpot forecast tool actually does
Before you start: requirements and permissions
Step 1: Set your forecast deal amount
Step 2: Choose your forecast period
Step 3: Enable the forecast submission status indicator
Step 4: Map your pipelines to forecast categories
Step 5: Customise categories and forecast table columns
Step 6: Set forecastable revenue goals
Step 7: Using forecast categories day to day
Best practices to keep your forecast reliable
What the HubSpot forecast tool actually does
The HubSpot forecast tool gives sales and revenue leaders a single view of how much revenue is likely to close in a given period, based on the deals in your pipelines. Instead of manually exporting data or building static reports, you can:
- Track progress towards revenue goals by team, region, or individual.
- Group deals into categories that reflect their likelihood of closing.
- See which reps have submitted (or not submitted) an updated forecast.
- Drill into the deals that make up your number in real time.
Tip: Think of Forecast as your “source of truth” for where the month or quarter will land. If leaders are still using spreadsheets, your team will end up arguing about which number to trust.

Before you start: requirements and permissions
Before setting anything up, check the following:
- You’re using Sales Hub Professional or Enterprise, or Service Hub Professional or Enterprise.
- You have Super Admin access. Only Super Admins can configure forecast settings and categories.
- Your sales pipelines and deal stages are already defined and in active use.
Users with Forecast permissions can view and work inside the forecast tool and submit their own forecast, but they cannot change the tool’s global settings or category configuration.
Tip: Do the initial configuration in a working session with your sales leader. You’ll avoid rework later if the settings reflect how leadership actually reads the numbers.
Step 1: Set your forecast deal amount
The first decision is how HubSpot should calculate the amount that appears in your forecasts and related reports.
- In HubSpot, click the settings icon in the top navigation.
- In the left-hand menu, go to Objects > Forecast.
- Under Forecast deal amount, choose one of:
- Weighted amount: deal amount multiplied by deal probability.
- Total amount: the full deal amount, regardless of probability.
- Forecast amount (legacy): uses a separate property where probability can be set manually or via workflows (visible only in older portals).
Tip: If your team is still maturing its pipeline discipline, start with Total amount for simplicity. Once stage probabilities are consistently accurate, move to Weighted amount for a more realistic view.

Step 2: Choose your forecast period
The forecast period controls how goals and submissions are structured across all pipelines.
- In Settings > Objects > Forecast, find the option to Select the forecast period for all pipelines.
- Choose either Monthly or Quarterly from the dropdown.
Important: if you change this setting later, existing forecastable revenue goals and any submissions will be reset and need to be recreated.
Tip: Match your forecast period to how leadership reviews performance. If your exec team thinks in quarters, choose quarterly even if your operational reporting is monthly.
Step 3: Enable the forecast submission status indicator
To keep your forecast current, you need reps and managers to review and submit their latest view regularly. The submission status indicator makes it obvious who hasn’t updated their forecast recently.
- Go to Settings > Objects > Forecast.
- In the Forecast submissions section, tick the checkbox for Forecast submission status indicator.
- Set how many days can pass before a forecast is considered “out of date” (default is eight; you can go up to thirty-one).
Once enabled, an indicator appears in the Forecast submission column for users who haven’t updated their forecast within the timeframe you chose.
Tip: Align the days setting with your sales cadence. For weekly pipeline meetings, 7–10 days works well so you can spot stale submissions before you walk into the room.

Step 4: Map your pipelines to forecast categories
Forecast categories group deals according to how likely they are to close. This is the foundation of your forecast view.
4.1 Open the pipeline forecast settings
- Go to Settings > Objects > Forecast.
- Click the Pipelines tab.
- Use the Select a pipeline dropdown to choose the sales pipeline you want to configure.
4.2 Assign deal stages to forecast categories
For each pipeline, you’ll see your deal stages and a set of forecast categories. By default, you can assign stages into categories such as:
- Not forecasted: deals in this period that aren’t counted in the forecast.
- Pipeline: early-stage deals with a low likelihood of closing.
- Best case: deals that could close in favourable conditions.
- Commit: deals the team believes will close and has committed to.
- Closed won: deals that have closed in the forecast period.
Tick or clear the checkboxes to include specific deal stages in each category. Click Save when you’re done.
4.3 Automate forecast category updates
You can ask HubSpot to update the Forecast category property automatically when a deal moves stage:
- In the pipeline forecast settings, toggle Automate forecast categories on.
- HubSpot will create a workflow named Forecast Category Mapping for Pipeline: [pipeline name] in the workflows tool.
You can later clone and customise that workflow if you want more granular rules.
Tip: Start with automation switched on to keep things simple. As your process matures, you can clone the default workflow and add extra logic for enterprise deals, renewals, or special segments.
Step 5: Customise categories and forecast table columns
5.1 Edit or add forecast category labels
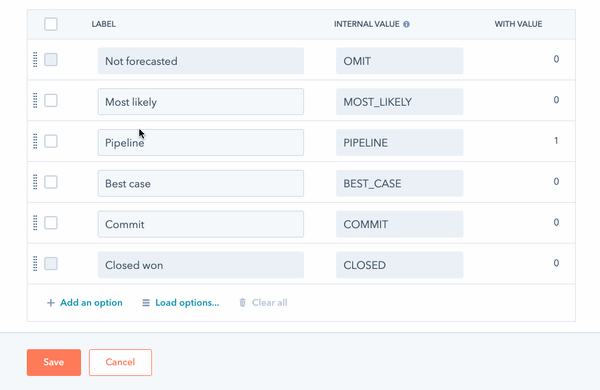
If the default labels don’t match your internal language, you can rename or add categories:
- In Settings > Objects > Forecast, on the Setup tab, click Edit forecast categories.
- In the right-hand panel, change existing values or click Add an option to create a new category.
- Click Save.
HubSpot will only display the last five custom categories in your forecast mapping (plus Not forecasted and Closed won), so if you have many options, drag the ones you care about into the last five positions.
Tip: The order of categories matters for analytics. Deals are treated as “moving forward” when they move down the list. Keep your categories in a logical progression from low to high confidence.
5.2 Choose which columns appear in the forecast table
To keep your forecast view focused, Super Admins can control which columns are shown by default.
- In Settings > Objects > Forecast, click Customise the forecast category table.
- Select the fields you want to appear (for example, goal, forecast, closed won, pipeline, submission status).
- Click Save.
Tip: Aim for clarity, not completeness. Too many columns turn the forecast into a wall of numbers. Start with goal, forecast, closed won, and one pipeline metric.
Step 6: Set forecastable revenue goals
Once your forecast tool is configured, you need to give it something to measure against: revenue goals.
To create forecastable goals:
- Navigate to Sales > Forecast in the main navigation.
- In the top right, click Create goal.
- Make sure the Forecastable Revenue template is selected.
- Choose which users or teams the goal applies to, plus the pipeline and time period.
- Set the target amounts and click Done.
To view or assign a goal, users need an assigned Sales Hub (Starter, Professional, or Enterprise) or Service Hub Enterprise seat.
Tip: Make sure your goal filters (pipeline, date range, team) match the configuration used in the forecast view – otherwise numbers won’t line up and you’ll lose trust in the tool.
Step 7: Using forecast categories day to day
As reps work deals, they’ll often reassess how likely a deal is to close. Even if you use automation, they can still manually adjust the forecast category on individual deals.
To update the category on a single deal:
- Go to CRM > Deals and open the relevant deal.
- In the left-hand sidebar, click Actions > View all properties.
- Search for the Forecast category property.
- Choose a new category from the dropdown and click Save.
These changes will feed back into the forecast tool, updating your roll-up view for the team.
Tip: Coach reps on what each category really means. If “Commit” becomes a parking spot for everything they’re hopeful about, the forecast will quickly drift from reality.

Best practices to keep your forecast reliable
Setting up the tool is only half the job. A forecast is only as accurate as the data that feeds it.
- Keep deal data clean: close dates, amounts, and stages must be accurate.
- Review categories regularly: check whether deals in Commit and Best case are closing at the rate you expect.
- Use the submission indicator: build a habit of updating forecasts before pipeline or board meetings.
- Align on definitions: document what each category means and share it with the whole team.
- Iterate as you learn: if your pipeline stages or pricing change, revisit your mapping and deal amount settings.
Tip: Treat your forecast as a living system. Build a recurring monthly or quarterly review where RevOps, sales, and finance look at accuracy and adjust assumptions together.
When your forecast tool is configured properly – and your team uses it consistently – HubSpot shifts from being a record of what happened to a live picture of what’s coming. That’s where better planning, better coaching, and better revenue decisions start.
Want help designing a forecasting process that suits your sales cycle? Speak to the Velocity team about rolling out HubSpot forecasting across your organisation.